
Adapting to Low Back Pain (Part 2)
As discussed in Part 1 of this article, Low Back Pain (LBP) can be quite limiting for daily life.
It can cause:
- alterations in a person’s breathing pattern
- reduced ability to reflexively relax or create tension
- decreased mobility throughout the body; and
- a loss of endurance capacity.
Animal Flow can play an integral role in restoring all of these qualities in a manner that improves body awareness and a sense of safety to rebuild confidence in movement. In this article, I’ve outlined four stages that can be followed to help you achieve this. The assumption is that you’ve been cleared to move and exercise, and you are not currently in an acute stage of pain.
Medical Disclaimer
The content in this article is not intended to be a substitute for professional medical advice, diagnosis, or treatment. Always seek the advice of your physician or other qualified health provider with any questions you may have regarding your health and/or a medical condition. Never disregard professional medical advice because of something you have read on this website.
Step 1: Check Yourself (to Establish Your Personal Starting Point)
Setting your personal Starting Point involves assessing three Base Positions (Beast, Crab, Loaded Beast) to observe:
- How well you can achieve the techniques points of each position; and
- How long you can hold them for while maintaining technical integrity. E.g.: 5, 10, 20, or 30 seconds.
Step 2: Build Endurance and ROM
We know that muscular endurance and range of motion (ROM) are both frequently compromised in those with LBP. For this reason, the first priority is to develop these capacities using deconstructed or de-loaded techniques. Endurance is developed with static holds in our Base Positions and range of motion (ROM) is gained using deconstructed Form Specific Stretches.
A few guidelines:
- Stay shy of complete fatigue: If you max. out at 20 seconds holding Crab, do 2 or 3 sets at 10-15 seconds each.
- Keep every repetition as high-quality as possible: If you feel your technique is regressing or that you’re holding your breath, stop and increase your rest time, or end your practice for the day.
- Select the movements that feel the least threatening to you and train those first.
Deconstructed Crab Reach
Deconstructing a Crab Reach can involve raising the hands and practicing just the hand lift, then the bridge (which we call a ‘3-Point Bridge’), then the reach. Over time, you can lower the height of the hand until you’re down to the floor.
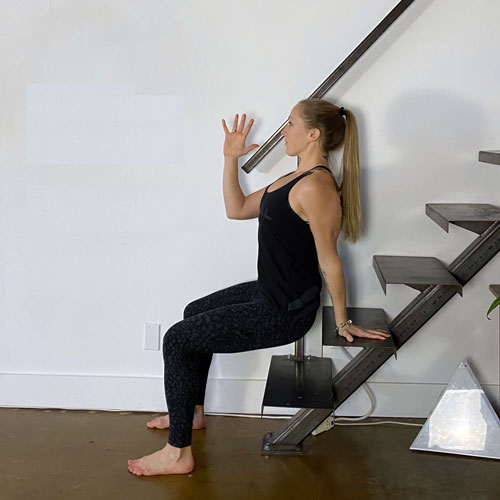
Begin with a single hand lift.
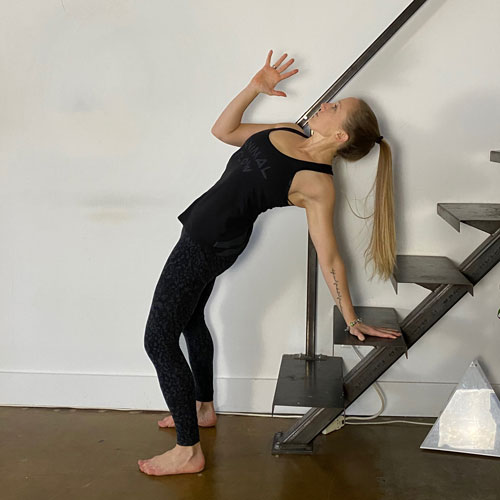
Deconstructed 3-Point Bridge.
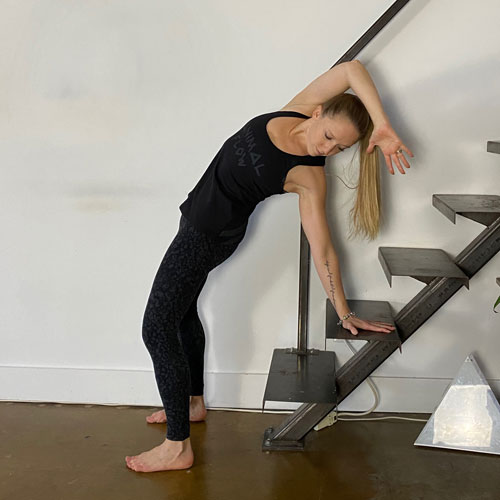
Add the arm reach.
Deconstructed Scorpion Reach
To deconstruct a Scorpion Reach, you can add more points of contact with the floor (the forearms and the knee) to increase your sense of safety and stability while focusing on hip mobility. Over time, you can decrease the contact points with the floor to increase the range of motion.
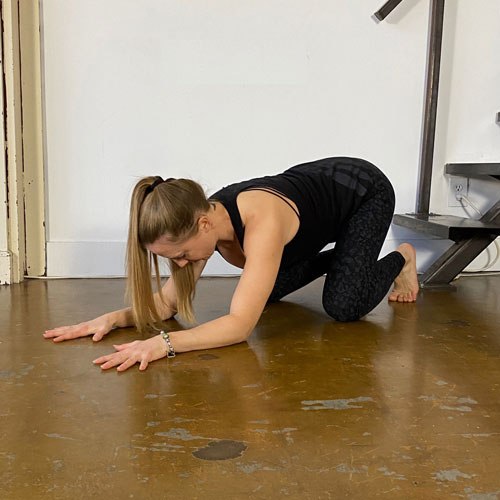
Begin with forearms and knees on the ground.
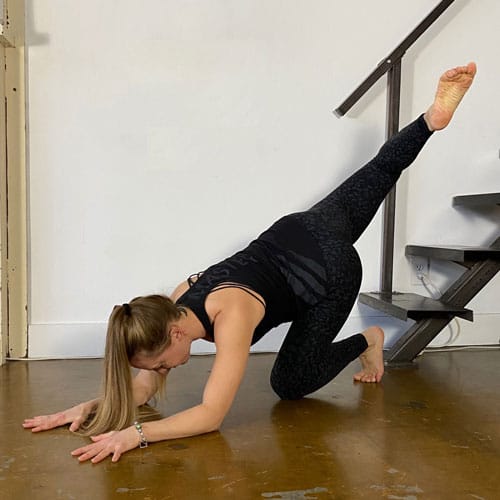
Circle leg diagonally up and back, bringing your shin towards the sky.
Movement snacks
During Step 2, you can also employ the strategy of “movement snacks” to slowly build your tolerance and allow your tissues to adapt. Movement snacks are small, frequent activity breaks interspersed throughout your day. They are an excellent way to scatter more practice throughout your day. These short breaks (ex: 2 modified Crab Reaches done 3X within the day), allow you to recover and repeat the effort sooner while giving your body a break from static sitting or standing postures.
Step 3: Increase the Load
Increasing the load refers to adding an additional level of challenge to your body. We do this in order to progress your capacity towards a greater variety of movement demands. In bodyweight training and LBP, increased load can be as simple as:
- Increasing the number of repetitions or time under tension: Doing an extra set, increasing a hold by 5-10 seconds, or adding one or two repetitions of a movement.
- Changing the challenge: Static Beast can turn into Activations or Forward and Reverse Traveling Beast which adds a counter-rotation challenge to the spine.
- Adding a layer of progression to a movement: Beast Activations can be done with four points of contact instead of six, or a Deconstructed Ape Reach is progressed to using either less support or more ROM.
Below are two examples of how you could progress movements over time: Ape Reach and Beast Activations.
Ape Reach progressions
- A hinge with an arm support
- A deeper squat with arm support
- Adding in the “Open” phase with arm support.
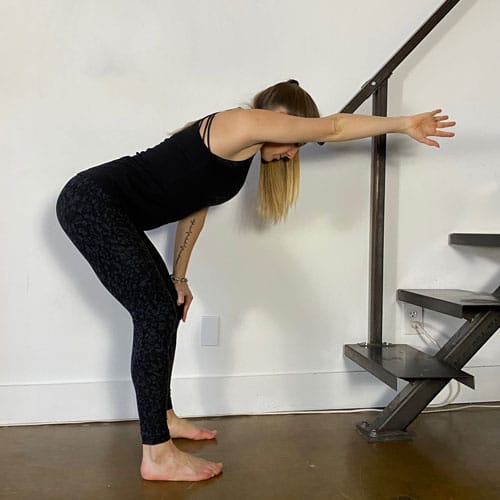
Single arm support.
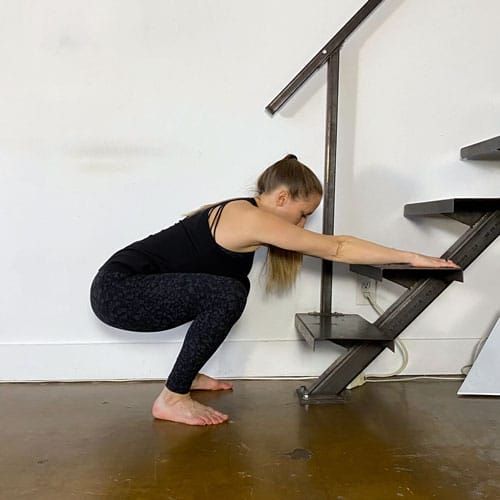
Double arm support.
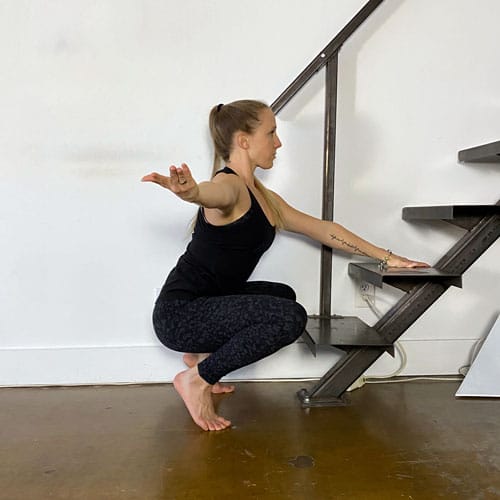
‘Open’, with single arm support.
Beast Activations
Beast Activations can progress by moving from knees on the ground to knees off of the ground.
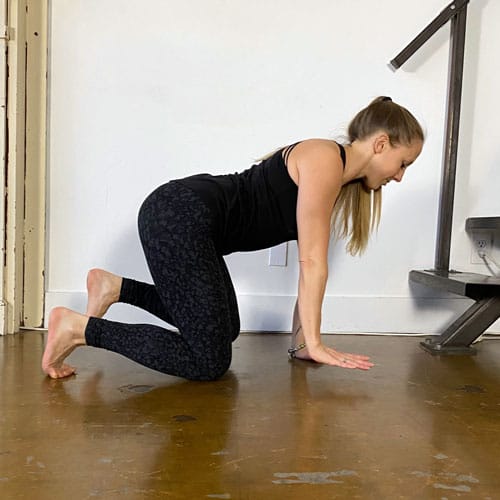
Beast Activation with knees on the ground.
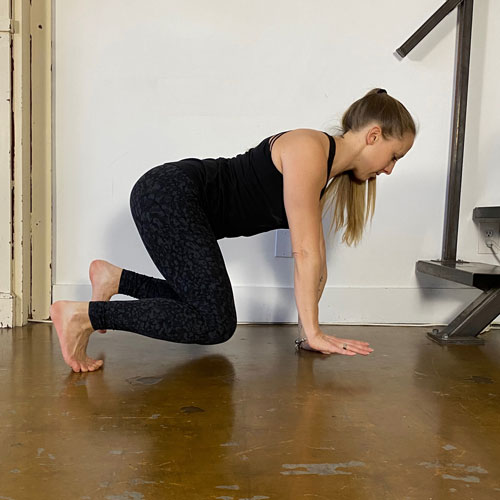
Beast Activation with knees off the ground.
Step 4: Dynamic Tasks
Animal Flow is well known for the Switches and Transitions (S&Ts) that make up the majority of Flows. S&Ts are perfect for training coordination, reflexive tension and relaxation, and increasing movement variability across all joints. Once the foundations of endurance, mobility/ROM, and counter-rotation challenges have been successfully integrated, dynamic tasks such as those found in S&Ts can be added in. As with the base positions and Form Specific Stretches, S&Ts can first be modified by increasing points of contact with the ground.
A few guidelines:
- Start with S&Ts in smaller ranges such as Underswitches, Modified Front Steps, and Side Kickthroughs.
- Progress towards S&Ts with greater ranges of motion such as an Underswitch to Scorpion Reach or Front Step Through.
- Add in movements with a ballistic (landing or jumping) component such as Jumping Underswitches, Full Scorpions, and Front Kickthroughs last!
For example, Front Steps can be done from a 6-point Loaded Beast with the hands set closer to the knees to start.
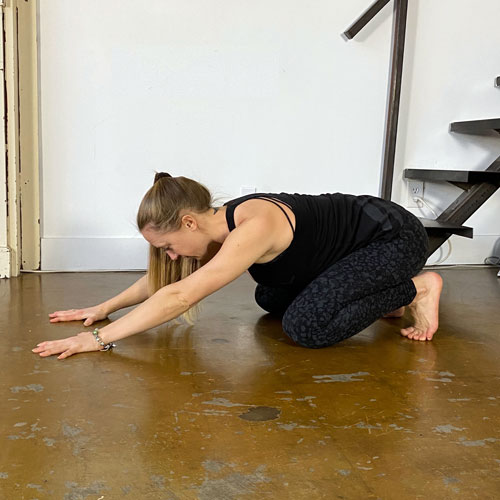
Knees down for 6-Point Loaded Beast.
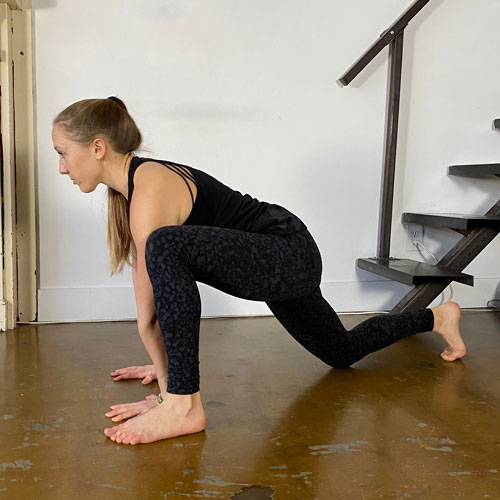
Deconstructed Front Step.
Pacing & Self-Monitoring
Recall from Part 1 that fear is a very normal part of recovery from any injury. Selecting the right progressions for your body and knowing how to check in on your system can help increase your sense of safety:
- Check in on your breathing to ensure that you are not holding your breath as you practice.
- Listen to your landings to ensure they’re as light as possible as this is a sign of whether you’re retaining control.
- Send your brain to your hands and feet: Instead of worrying about your back, pay close attention to your ground contact points as this will help you elicit better control.
- ‘Own slow’ in your movements to earn speed.
Tissues, tendons and ligaments take time to adapt. Doing too much or too little movement can be equally problematic. When training to regain capacity, a simple but effective strategy is to train the same progressions until you feel very successful (stable with good technique). Only then should you add in the next step. That may mean that some people train the same techniques for four weeks before progressing while others need 8 – 10 weeks. Embrace the process of practice and your back will thank you.
Ready to see if Animal Flow can help your back pain? Discuss with your medical practitioner whether Animal Flow might be right for you and then try some of the movements for yourself with Animal Flow On Demand. Check out the Deconstructed movements that create even more accessibility for people with a range of restrictions or limitations.
